FAQ
FAQ General
Connected IO modems are compatible with most LTE networks in the US and Canada.
Please Contact sales to double-check that your carrier is supported.
Here is a table with some of the common LTE network frequencies.
| Carrier | 4G LTE Bands | Frequencies |
|---|---|---|
| Verizon Wireless | 2, 4, 13 | 1900,1700 f, 700 c |
| T-Mobile | 2, 4, 12, 66, 71 | 1900,1700 def, 700 a, 600 |
| Sprint | 25, 26, 41 | 1900g, 850, 2500 |
| Europe | 3, 7, 20 | 1800,2600, 800 |
| China, India | 40, 41 | 2300,2500 |
*Main band for each carrier is marked in bold.

In order to activate a Connected IO device you need to contact your Carrier B2B sales representative.
If you are not currently working with a B2B sales representative please contact Connected IO at 669-221-6100 or via email at sales@connectedio.com
Connected IO devices require external antennas to operate properly. For applications with low bandwidth requirements, in areas with solid 4G coverage, one antenna (primary) is sufficient. For all other applications, two antennas (primary and secondary) are required.
Operating temperature range for Connected IO Products is -25 to +60 degrees Celsius.
Connected IO wants you to love the devices and accessories that you buy from us. If you aren’t happy with something you bought, you can return an item within 15 calendar days after the day you received it. We’ll send a full refund (minus your original shipping & handling charges) within 14 business days after Connected IO receives the device.
Connected IO doesn’t do exchanges.
You can verify the firmware version of your router by going to the https://cloud.connectedio.com/device/router/ page device management page

You can compare that to the latest version of Firmware on the Connected IO Website.

If a newer version is available, download it, and then push it to your Connected IO device through the Device Settings/ Upgrade menu.

In the Device Management page:
https://cloud.connectedio.com/device/router/
Click configure menu:

Go to FireWall Tab and select General settings:

To set Traffic Rules click on the tab:


FAQ Modems
Our Modem works fine with Meraki version MX 14.53 Z1 / Z3
MX64 with firmware version 14.53 ( may take some longer time to recognize a modem)
To run a connection with Meraki you have to use an additional PS(Power Supply) connected to the modem
(Because of Meraki does not provide enough voltage power from a USB port to activate a modem)
To get it to work make sure the Meraki version is supported.
Run connection with modem first (https://www.connectedio.com/support#how-do-i-configure-the-modem)
When connecting to Meraki
For more information please refer to Meraki documentation:
https://documentation.meraki.com/MX/Cellular_with_USB_Modems
Few troubleshooting tips:
1. Make sure SIM card activated & provisioned properly with M2M Plan
2. Please check a signal and data transfer on your PC/Laptop before connecting to Meraki
3. Use the power supply when connecting to Meraki USB
4. Data cable may not be compatible with the Meraki device you tried to connect ( please replace "Y" or " V" cable provided and use standard USB to MicroUSB cable and powercycle Meraki without powercycling modem! )
5. Make sure USB port on Meraki device fully functioned and recognized new connection ( Please connect to Meraki portal and check connection verification, sometimes USB may lose or malfunction and does not recognize connections)
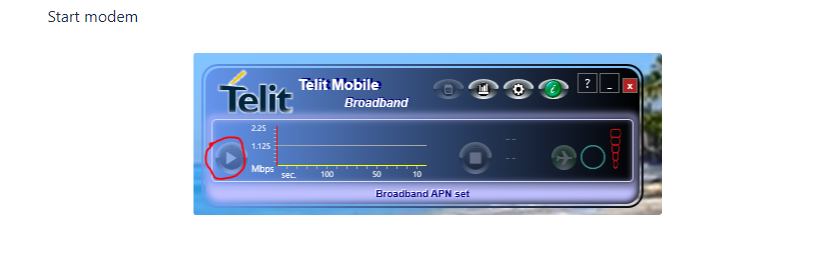
To connect Connected IO devices to a 4G network, type the following
AT%CMATT=1 //attach to the eNodeB and register on the network
AT%DPDNACT=1 //enable the data-plane
To disconnect Connected IO devices from 4G network, type the following
AT%DPDNACT=0 //disable the data-plane
Connected IO devices support IP pass-through mode by default. IP addresses are assigned to the host device rather than the Modem.
Unlike a router, which is a standalone device, a modem is a peripheral and depends upon a host. Connected IO Modems support Windows and Linux hosts. Each needs a driver to know how to communicate with the modem.
Setting up a modem consists of three simple steps:
1. First, install the proper driver on your host computer.
https://connectedio.com/support?q=2
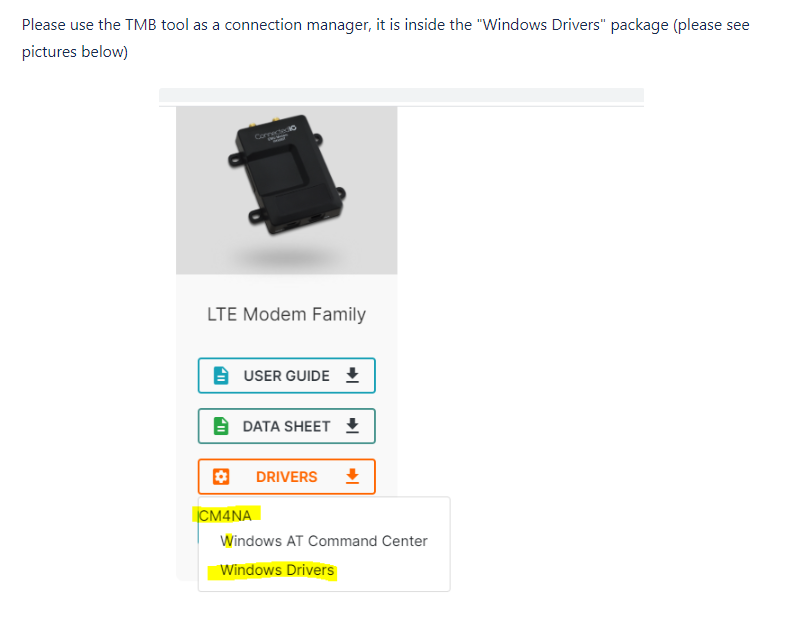

2. Then connect the modem and power it up.
3. Lastly, activate the modem and tell it where to 'communicate'
To connect, use the USB cable, as desired, and plug in the modem until the Power LED illuminates.
To configure the driver, follow the next step to make some additional changes for driver signature disabling:
4. Additional changes for driver signature disabling:
Windows blocks Telit USB ports since Telit's drivers are not signed by Microsoft.
Please use the link below (option 2) to disable driver signature enforcement (it should be re-enabled on the next reboot):
5. Linux driver support:
To allow-hotplug and start data on raspberry do :
sudo vim /etc/network/interfaces
And add the following lines:
allow-hotplug usb0
auto usb0
iface usb0 inet manual
up path/to/StartDataCM4NA.sh
Link to Linux USB driver install user guide: Here
Dynamic IP (VZWINTERNET)
With dynamic IP addresses, incoming connections into the host system behind your devices are blocked.
Static IP (VZWSTATIC)
With static IP addresses, inbound connections into the host system behind Machine Connect are allowed. Any application that requires remote access to the host device needs to use Static IP addresses.
M2M static SIM is EAAA.NP.GW2.VZWENTP
Connected IO Modems are certified for Verizon Private Network connectivity.
Due to AT&T’s 3G sunsetting network upgrades EM1000T-NA-CAT1 and CM4NA modems running on AT&T’s network need to make configuration changes. Customers can implement this change by issuing the AT command “AT+CEMODE=2”. Failure to implement this change may prevent the devices from connecting to AT&T’s network.
FAQ Routers
To get into a Connected IO Router, you need to do three things.
1. Prep your PC by configuring a physical Ethernet port to an address of 192.168.71.X, where X is any number from 2 to 254.
2. Attach an Ethernet cable between the Router and your PC’s Ethernet port and power up the Router. (run: ping 192.168.71.1 command to make sure router replied)
3. Open a browser and type http://192.168.71.1 in the address bar. You should see the Login screen appear in your Browser. Type a default user name root and default password from the quickstart guide.
If you do not, Consult the User Guide for troubleshooting steps.
Click here to see a video:

1. Please select a device from the list you want to upgrade
2. Click on the Settings menu, and select upgrade:
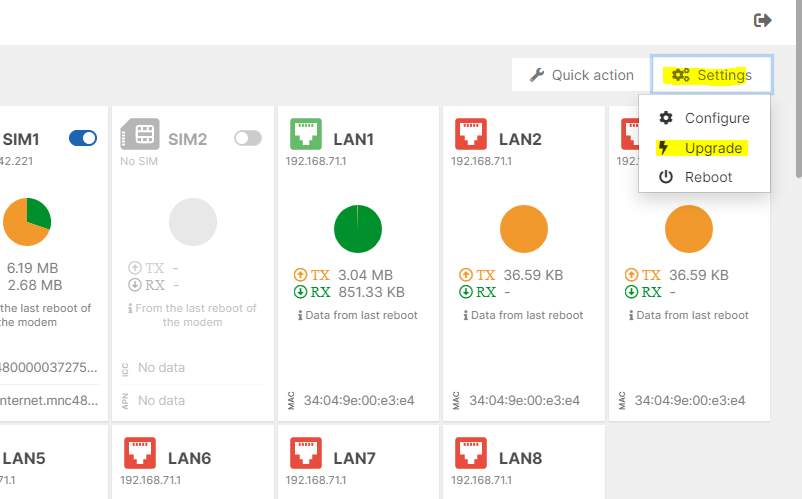
3. Select version to upgrade to from the drop-down list:
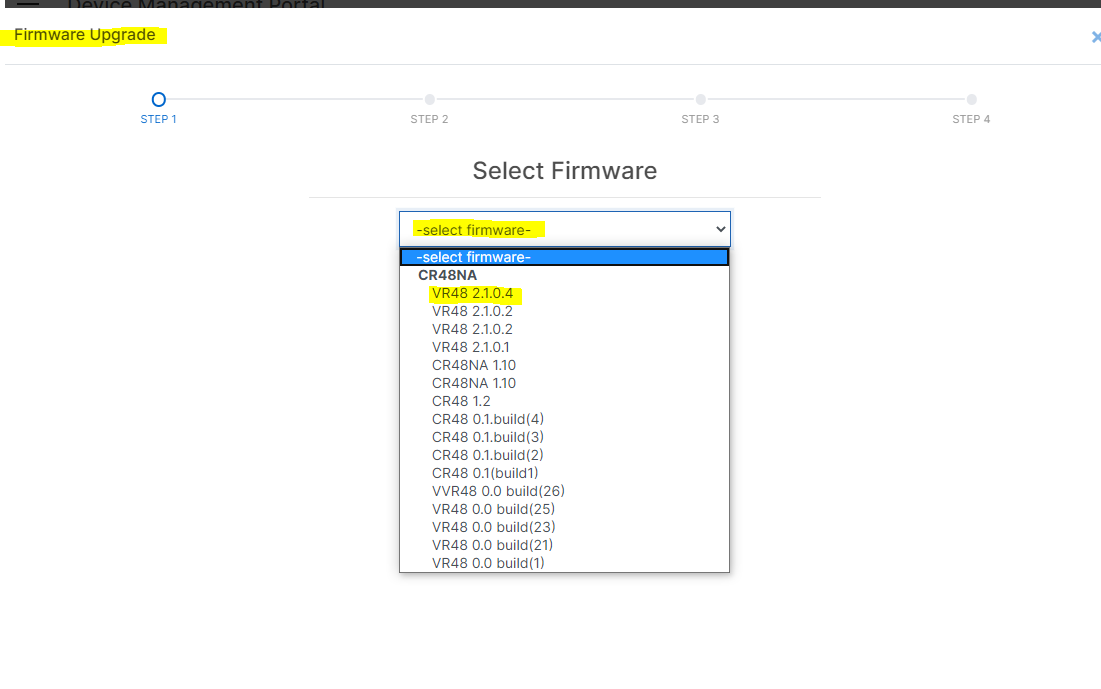
4. Select checkbox next to the device you want to start to upgrade
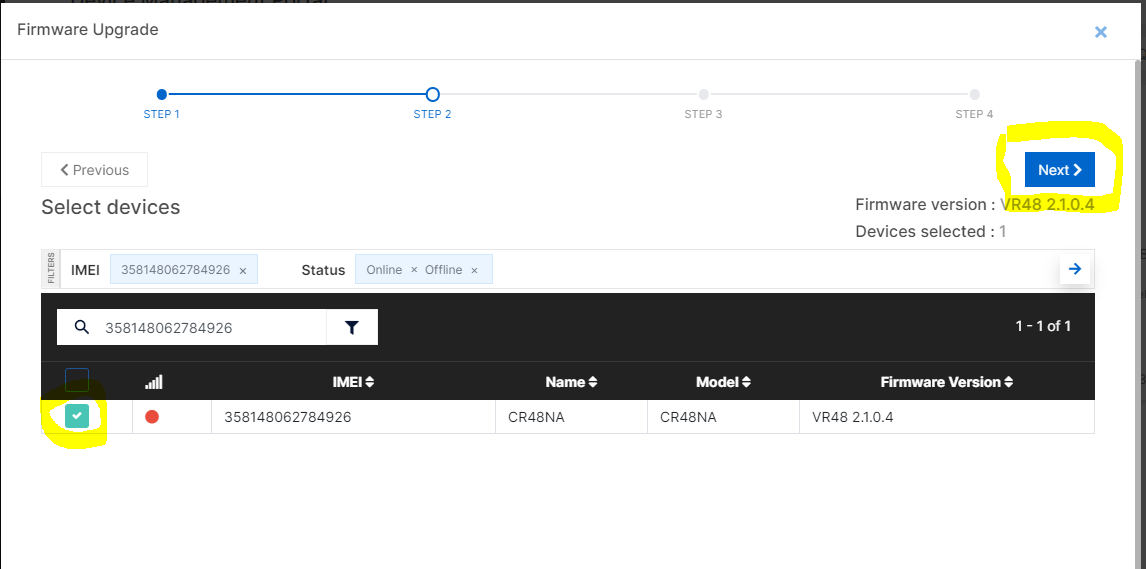
5. Select required conditions ( save the configuration or do factory restore etc) and start the upgrade.

From Cloud Portal:https://cloud.connectedio.com/
1. Go to the device configuration page, and open a WiFi tab:

2 Click Edit icon and edit SSID name, and click save icon:

3. Keep in mind update may require device module restart( may take a few seconds)
The default IP of the ER1000 is 192.168.45.1 the default IP of the ER2000 & CR48 series is 192.168.71.1.
The default username is "root" and the password is based on the model:
ER1000: CioER1000!
ER2500: CioER2500!
CR48NA: cio@123$
Unlike previous versions of the Windows operating system, Windows 8 imposes strict limitations on driver signing. Because of this, unsigned drivers require extra steps for installation.
What to do:
1.Open Device page

2. Click on Quick Action menu to add the device


Complete the required fields and click save.
You can check the video:
CR48 XX:
WiFi password for 2.4 Ghz module: “ciotech123!”
WiFi password for 5.0 Ghz module: “ciotech12345!”
Default WiFi SSIDs: CIO-M2M and CIO-M2M-5Ghz
ER2000 and ER2500:
- SSID: ConnectedIO_M2M
- Password: CIO-last_6_digits_of_LAN_MAC (no colon)
1 To set SIM Fail-Over configuration you need to have installed 2 SIM cards and all cards need to be activated

2. Switch for default card will be enabled only if 2 cards active
3. Admin can use a 1-time update or daily

4. Need to refresh device to get latest settings activated

Please check the video :
1. Open device management page:

2. Click on the Setting menu and select configure
3. Click on any Modules Tab you want to manage/change

4 Click save when you done with configurations
**** At some modules required device restart or router needs to be rebooted (it may take 30sec to 1 min)
How to update APN information:
Update using an APN change module from Cloud Portal:
1. Go to device management page and select config option from Settings menu

When clicking on the LTE TAB you'' be able to change /add new APN

Add new APN info and click Save, Make sure new APN switched to active

Due to AT&T’s 3G sunsetting network upgrades ER2000T-NA-CAT1, ER2500T-NA-CAT1, and CR48 routers running on AT&T’s network need to be upgraded to firmware version 2.1.1.0. Failure to upgrade the devices may prevent them from connecting to AT&T’s network.
FAQ Archived
1. Plug the LT1001 to the Raspberry PI board, (make sure to first power on the device to allow initialization of the device prior to raspberry Connection.) It will show up as eth(x)
ifconfig -a
2. Add the following lines in the file etc/network/interfaces Remember to replace (x) with your value.
allow-hotplug eth(x)
iface eth3 inet dhcp
Then, reboot the device
Note: You must do this from a Windows PC or Laptop using WINDOWS 7 or above. Ask your Verizon Rep for your APN and credentials
Download Required Software
1. Visit support
2. Select “Software” from the list.
3. Locate Windows Connection Manger Software under LT1000, and select the appropriate 32 or 64 bit operating system.
4. Download the file to your Windows PC.
5. Download Windows Device Drivers
6. Open and Install Windows Device Drivers by opening the zip file and clicking on the “Build4194_All_Embedded” Folder.
7. Open the “Installer” Folder
8. Click on the Executable File(.exe)
Install Skylight Connection Manager by clicking the .msi file previously downloaded.
Once you have installed these files,
1. Connect the LT1000 to the power supply, wait 10 seconds, then connect the USB to the Laptop
2. Drivers will automatically install.
3. When finished, Open the Skylight Connection Manager
4. Allow the device to connect to Carrier's Network.
Changing the APN
In order to Change the APN you must obtain this information from your Verizon Representative:
1. APN
2. Username
3. Password
Once you have obtained this information:
1. Click on the menu box on the Skylight Connection Manager
2. Select Connections
3. Select Profiles and Select a profile
4. Click on the APN box and enter APN
5. Click on Username and enter your assigned username
6. Click on Password and enter your assigned password
7. Click Apply
8. Click OK
- Kiosk and Vending Machines
- OEM Design Applications
- Point of Sale (POS) Systems
- Embedded Systems
- Smart Grid
- Connected Health
- Remote Video
- Remote Access
- Digital Signs
Dynamic IP (VZWINTERNET)
With dynamic IP addresses, incoming connections into the host system behind Machine Connect are blocked.
Static IP (VZWSTATIC)
With static IP addresses, inbound connections into the host system behind Machine Connect are allowed. Any application that requires remote access to the host device needs to use Static IP addresses.
M2M static SIM is EAAA.NP.GW2.VZWENTP
Machine Connect devices are certified for Verizon Private Network connectivity